How to sell online courses on your own site?

For centuries, formal education was confined to classrooms with blackboards, chairs and desks. Today the story is different. Anyone from all walks of life can train simply by taking an online course. No physical contact required! Creating and selling an online course has therefore become a game.

Furthermore, research shows that by 2026, the e-learning market size is expected to surpass 376 billion. This figure was positively impacted by the unfortunate pandemic of coronavirus (COVID-19). Like never before, e-learning tools are seeing a huge increase in usage.
Of course, now seems like the best time to gather your knowledge and be rewarded for it. So what do you need to launch and sell a profitable online course? How do you get people to buy your course?

Get 200% Bonus after your first deposit. Use this promo code: argent2035
What are the steps for launching your course? These questions and many more will be answered in this article. I promise to tell you everything.
Let's go
What you need
To create/sell an online course on your website you need to put together a number of things. It is mainly about:
- A web hosting account. A web host is a company that provides Internet hosting for various computer systems, such as websites, information storage, electronic mail, etc.
- Domain name. A domain name represents the access address to your site. It is the centerpiece of a website. It can be for example financededemain.com, financededemain.fr, etc.
- An SSL certificate. It guarantees payment security for visitors to your site. This certificate allows them to trust you.
- A website. The hosting and the domain name obtained previously allows you to create your website, it is the meeting platform for your learners.
- WordPress LMS plugin. These plugins allow you to very easily configure the posting of your courses.
How to Sell Online Courses From Your Website
Creating an online course is one of the most viable ways to make money online. It is an online business that guarantees a stream of income on a regular basis. So you have to do things right and selflessly.
| Bookmakers | Bonus | Bet now |
|---|---|---|
 | ✔️ Bonus : until €1950 + 150 free spins 💸 Wide range of slot machine games 🎁 Promo code : argent2035 |  |
 | ✔️Bonus : until €1500 + 150 free spins 💸 Wide range of casino games 🎁 Promo code : argent2035 |  |
 | ✔️ Bonus: up to 1750 € + 290 CHF 💸 Portfolio of top notch casinos 🎁 Promo code : 200euros |  |
Here are the steps you need to follow to be able to create and sell a course on your website.
Step 1: Find a profitable niche
Many people who have started online courses are struggling to succeed. One of the main reasons is that they haven't found the right niche.
Online courses are for solving problems. Your course should cover an area of need. These can be issues of health, parenthood, business growth, Islamic finance, e-business, etc.
Even if you are concerned with meeting the needs of your target audience, you must remain in your chosen field.
Ask the following questions to get the perfect idea. Here are some of those questions.
- What am I good at? You can ask close friends what they think of your area of strength.
- What excites me?
- What subject do I know more than many others?
Me, for example, I don't need to ask others to tell me my strengths. I am a research professor in a major business school in my country. And so, I can easily and easily create and sell courses in the field of business. And you ? Tell us in comments.
Step 2: Course creation
Creating quality content will help keep your students engaged and earn you more referrals. So, at this point, take your eyes off the money. Adding value to your students should be your primary goal.
Make sure your course delivers specific results to specific people.
Let's see an example.
Course subject: How to effectively manage your cash flow?
The following modules may apply to this subject:
- Presentation of cash?
- Cash management, a necessity
- Budget planning
- Budget planning tools.
The next thing to do is to assign learning objectives to each course module. A learning objective is a statement that explains the intended purpose of a module.
You can divide each module into several lessons. Your lessons can be in text or video format. If you need to create video content, you will need the following:
- A screen recorder
- A good camera
- An external microphone
- Lighting
- A tripod or gimbal stabilizer
Step 3: Create your website
The third thing to do to create and sell your course on the internet is to create a website. Building a WordPress site is easy. The following steps will guide you.
Get your domain name
No website is without a domain name. This is the unique name of a site, such as financeddemain.com.
| Bookmakers | Bonus | Bet now |
|---|---|---|
| ✔️ Bonus : until €1950 + 150 free spins 💸 Wide range of slot machine games 🎁 Promo code : 200euros | | |
 | ✔️Bonus : until €1500 + 150 free spins 💸 Wide range of casino games 🎁 Promo code : 200euros | |
 | ✔️ Bonus : until €1950 + 150 free spins 💸 Wide range of slot machine games 🎁 Promo code : WULLI | |
Follow these guidelines when choosing a domain name:
- Choose a descriptive name
Use a name that describes your site well. When you use a descriptive name, your visitors can tell what your site is about at first glance. You can also use your name.
- Be brief
Although a domain name can contain up to 63 characters, keep yours short. The shorter, the better!
- Use a memorable name
As a general rule, don't use a hard-to-spell, hard-to-remember, and hard-to-pronounce name. Look at mine, it's simple and easy to remember financeddemain.com
- No numbers or dashes

Using numbers or dashes can mislead your site visitors. Think about it: “1day” is a nice domain name. But, a user can use “oneday.com”. Also in the case of a domain with a hyphen, a visitor can type "mydomain.com" instead of "my-domain.com".
After finding the right domain name, check its availability. To do this, visit whois search page and enter the name you have chosen. However, if it is not available, try something different, until you find one available.

Get 200% Bonus after your first deposit. Use this official Promo code: argent2035
Register your domain name
Now it's time to register your domain. You need a domain registrar for this. Domain.com, Name.com, NameCheap.com, are just a few of the many registrars we have. So which one should you go to? Well, there is no set answer to that.
Just look for the following:
- Price
Don't be fooled. In many cases, registrars offer low introductory prices. But, that's just for the first year. Renewal prices are higher.
Ask about renewal fees before choosing a registrar.
- Domain transfer policies
Domains can be transferred from one registrar to another. Some companies may charge you to transfer a domain, others do it for free. You should therefore review a registrar's transfer policy for terms and conditions.
- Expiry Policy
What happens when your domain registration expires? Will your domain be sold? Or will you have time to pay? Find out what a company will do from the company expiration policy.
Choose a host
Every website, whether big or small, has a web host. A web host is responsible for the proper functioning of your website. To identify a good web host, look for the following:
| Bookmakers | Bonus | Bet now |
|---|---|---|
 | ✔️ Bonus : until €750 + 150 free spins 💸 Wide range of slot machine games 🎁 Promo code : 200euros ???? Cryptos: bitcoin, Dogecoin, etheureum, USDT | |
 | ✔️Bonus : until €2000 + 150 free spins 💸 Wide range of casino games 🎁 Cryptos: bitcoin, Dogecoin, etheureum, USDT | |
 | ✔️ Bonus: up to 1750 € + 290 CHF 💸 Top Crypto Casinos 🎁 Cryptos: bitcoin, Dogecoin, etheureum, USDT | |
- Speed
Can a slow loading site bore your visitors? 53% of mobile web visitors tend to leave a website/blog if it does not load within 3 seconds. Pitch your tent with a host who offers you good speed.

Get 200% Bonus after your first deposit. Use this promo code: argent2035
- Availability guarantee
What is availability? This is the length of time a website is online. You need your website to be up and running most of the time. Typically, the hosting industry standard for good uptime is 99,9%.
When a host guarantees you 99,9% uptime, what does that mean? This means that your website can be offline for around 8,64 hours per year. In other words, out of the 8 hours we have in a year, your website will run for 760 hours.
In most cases, downtime is due to maintenance.
Therefore, when shopping for a hosting platform, read the terms of service to find out what uptime guarantee they offer.
- Support
Sooner or later you will need help. A good host is supposed to offer a helping hand whenever you need it. This could be through live chat, email or phone.
- Safety
You have a role to play in the security of your website. Your web hosting provider too. Go for one that offers good security.
install WordPress
Udemy is a popular online course platform, as are Lynda and SkillShare. They allow you to create courses and host them on their sites as well.
However, an online course platform can prevent you from doing things on your terms. For this reason, you can create your online course and sell from your website.

If you're worried about your coding knowledge, calm down. WordPress requires little to no coding skills. Your WordPress host may feature a one-click WordPress installer. All you have to do is log into your hosting account and install WordPress. However, you can also do it manually.
Customize your new website
To change the look and feel of your website, install a WordPress theme. To install a theme, log into your WordPress admin area. Here's how :
First, navigate to “your domain name.com/wp-admin” on your web browser – replace your domain name.com with the actual domain of your site. Second, enter your user credentials. That's all.
In your dashboard, open Appearance> Themes
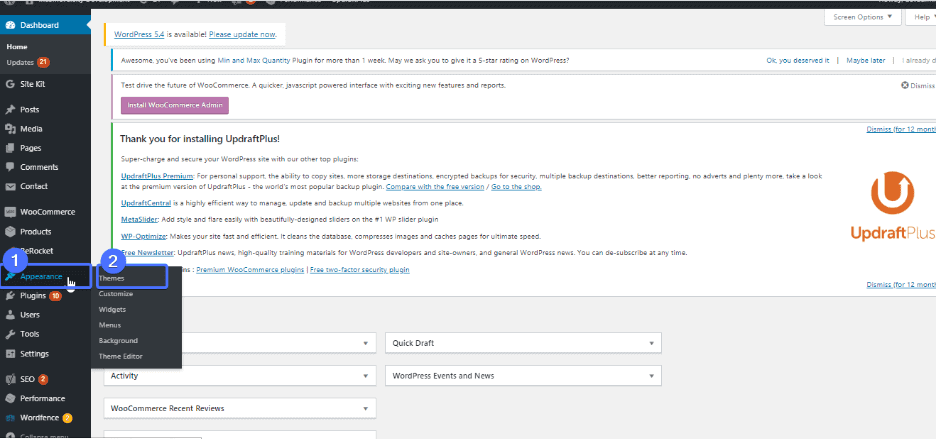
Now select one of the themes to install it. For more theme options, click "Add New". You will have more themes to choose from.
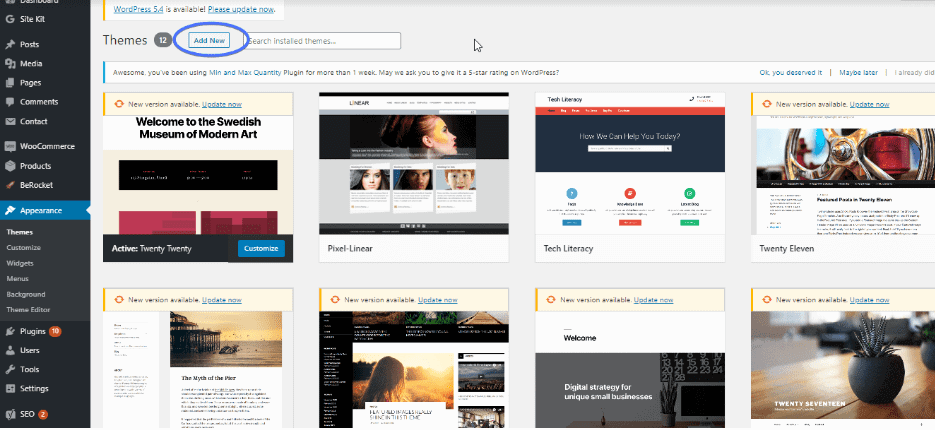
You can also find other themes on these websites:
- Forest theme.
- Elegant themes.
- Code Canyon.
- Fuse theme.
- Themify, etc.
Since you intend to sell online courses from your website, it makes sense to install a theme that is suitable for this purpose.
Optimize your site for search engines
If you hope to get a lot of readers and students one day, don't skip this part. You are up against so many competitors. So to stay relevant, optimize your site for search engines.
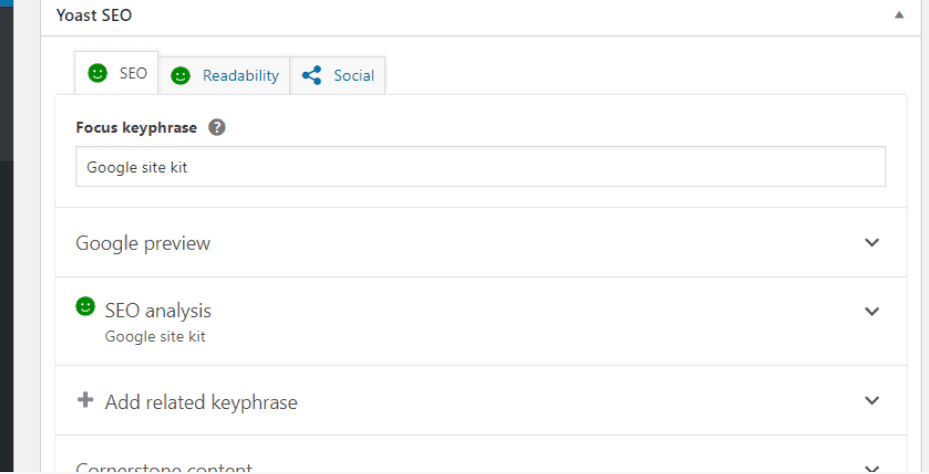
Fortunately, WordPress makes this part incredibly easy. So where to start ? First, install and activate an SEO plugin, such as Yoast SEO. Yoast SEO is a plugin that helps your WordPress site meet SEO standards.
To install, go to Plugins >> Add a new one in your WordPress dashboard. Next, search for Yoast SEO.
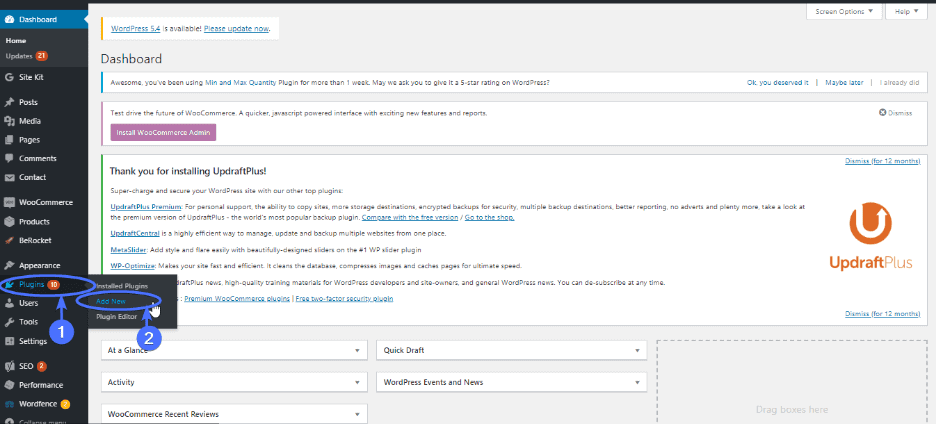
It will probably be the first plugin in your search results. Click on "Installer” then on “ Enable ».
Now, Yoast SEO is fully enabled on your blog. You can access the plugin settings via the “SEO” menu in the sidebar and the “Yoast” icon at the top of your dashboard.
Also, when editing a page or post, an SEO section appears under your WP editor. It shows you if your content is well optimized and readable. For each piece of content you create, therefore, check this section to find out what to improve.
Install other necessary plugins
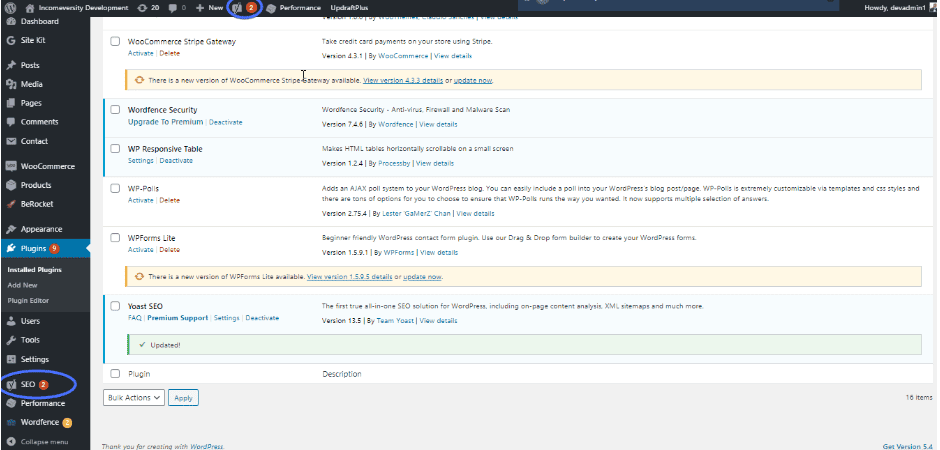
Moreover, to improve the functionality of your WordPress site, you will need several WordPress plugins. There are over 50 plugins in the WordPress plugin repository. So how many plugins should you install? How much is too much?
As a general rule, you should only stick to those that are very necessary for your website. And no more.
Remember that for every plugin you install, more codes are added to your site. More codes, however, means more processing. And this, as a result, results in a slower site.
Additionally, plugins take up valuable space and bandwidth. So, keep them as minimal as possible, especially if you're using a shared web hosting plan.
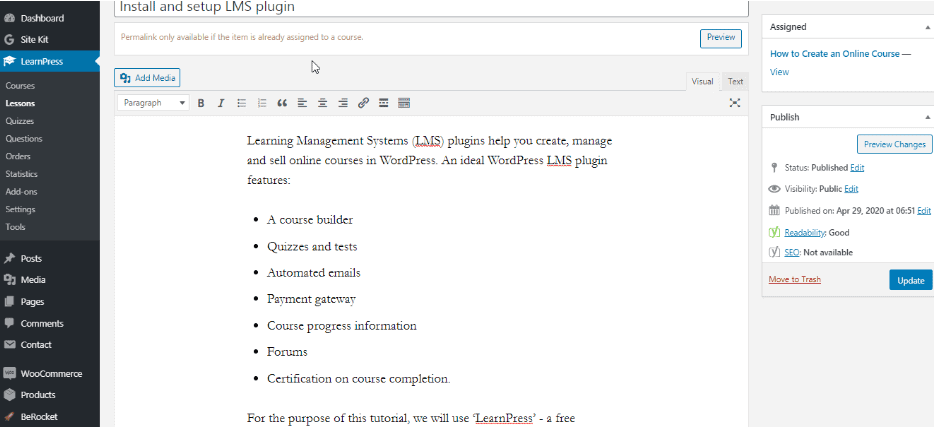
Install the WordPress LMS Plugin
A Learning Management Systems (LMS) plugin helps you create, manage, and sell your online course on the WordPress site. The features of an ideal WordPress LMS plugin:
- A course builder
- Quizzes and tests
- Automated emails
- Payment Gateway
- Course progress information
- Forum
- Certification at the end of the course.
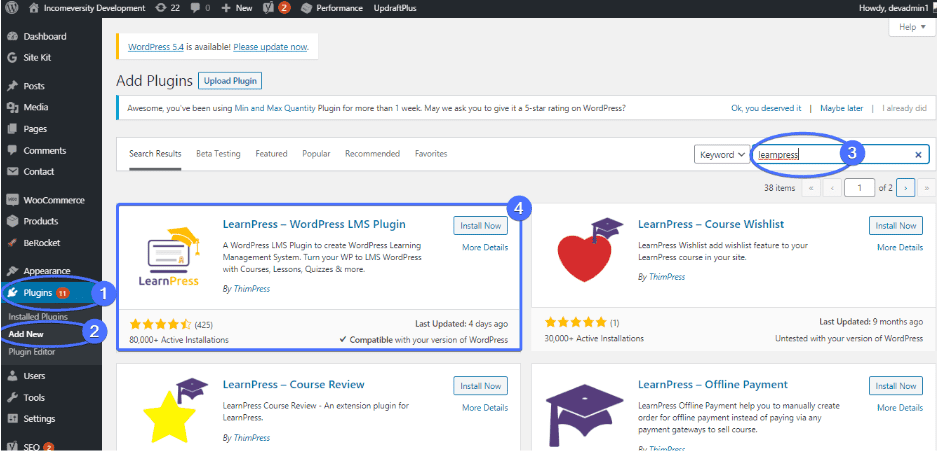
For the purposes of this tutorial, I am using “LearnPress” – a free WordPress LMS plugin.
How to use LearnPress
We're about to walk you through every step of creating a profitable course.

Note: there are other amazing LMS plugins, apart from LearnPress.
To install, open your WordPress dashboard. Then go to " Plugins >> Add New ". Type “LearnPress” in the search bar. Now install it by clicking “”.
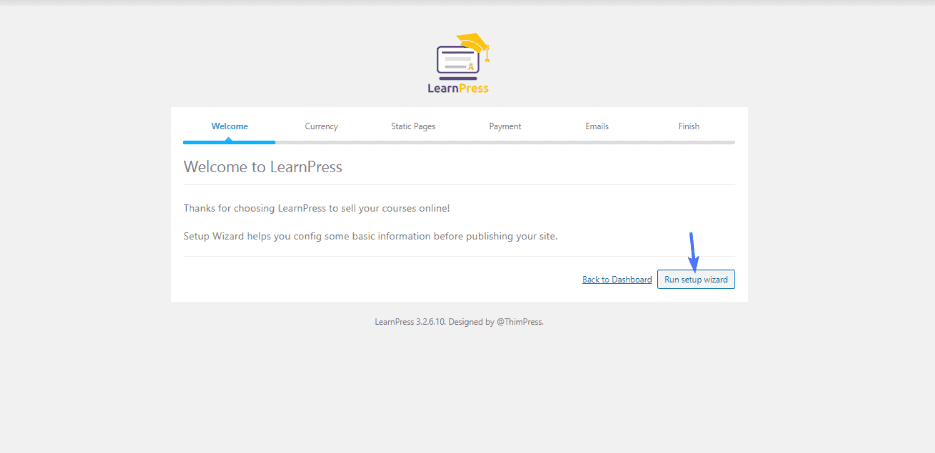
Then click "Run Setup Wizard".
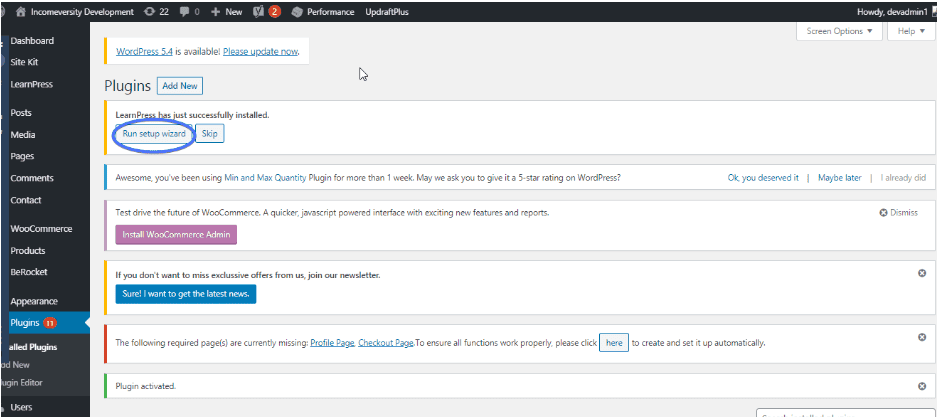
To clarify, there are 5 steps involved in setting up LearnPress. So to get started, click “Run Setup Wizard”.
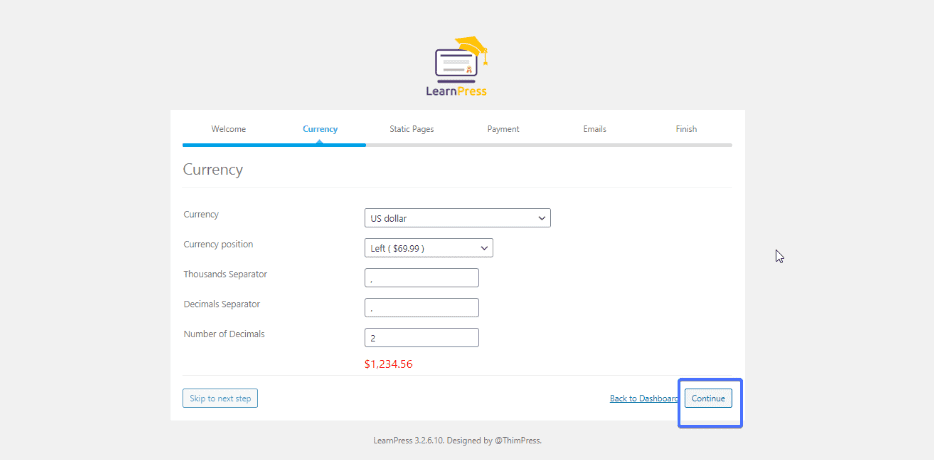
Next, configure your currency settings. What is your favorite currency? US dollar, euro, Canadian dollar? Well, there are over 160 currency options to choose from.
Additionally, you can choose the position of the currency – whether left ($1) or right ($200). You must also define the thousand separator, the decimal separator and the number of decimal places.
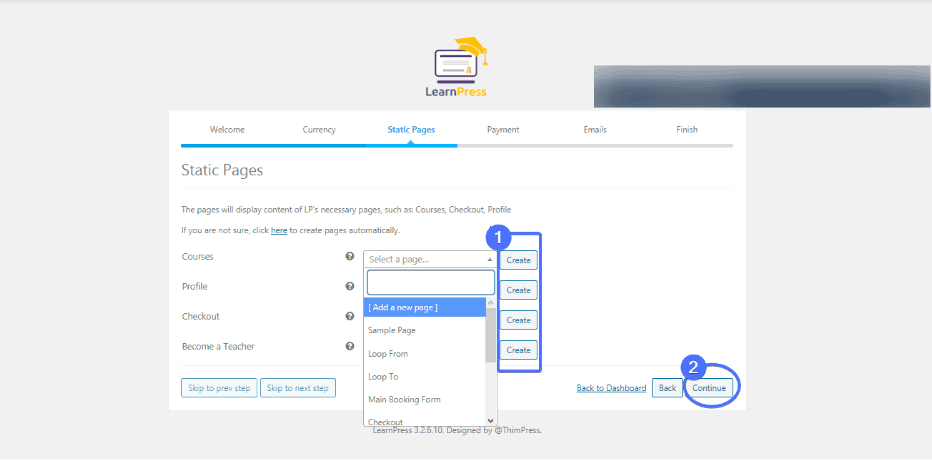
After that, the next section requires you to create pages. The setup wizard already suggests 4 pages – Courses, Profile, Payment and Become a teacher. However, you don't need to create all four.
The Courses and Payment pages are two pages you will need to get started. So, click on the button “ To create " (the one next to the page you want) and " Continue »
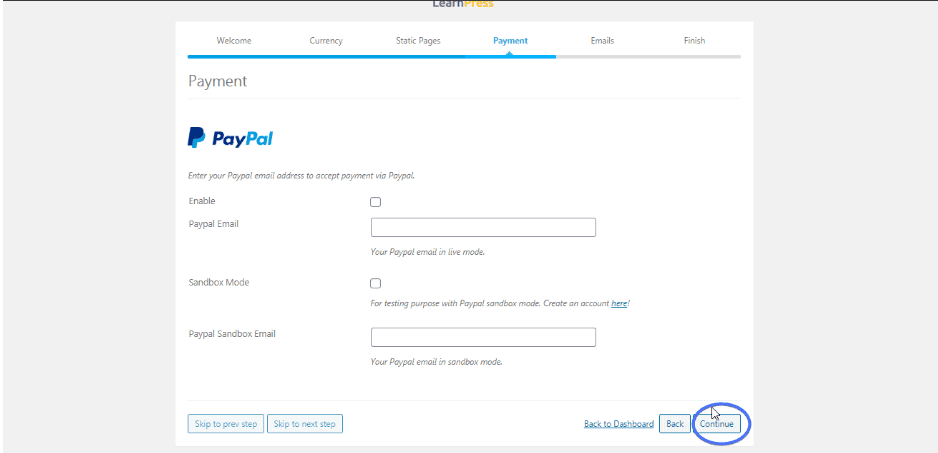
The next section is about payments. How do you accept payment for your courses? Simply tick "activate" and enter your PayPal address. Moreover, to use Payment gateways like Bande, Authorize.net and 2Checkout, purchase the respective add-ons. Now click “Continue”. Here's how to create a Paypal account with complete peace of mind.
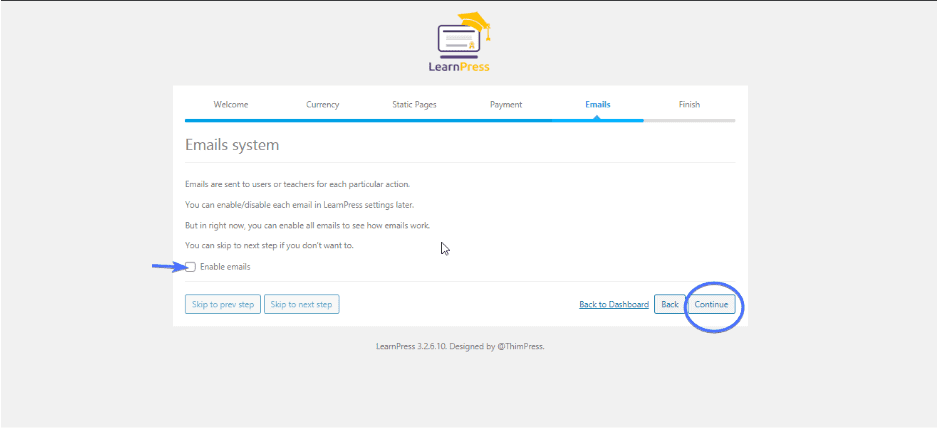
Communication also plays a key role in the success of online courses. So tick " activate to allow communication by e-mail. Then click on " Continue ».
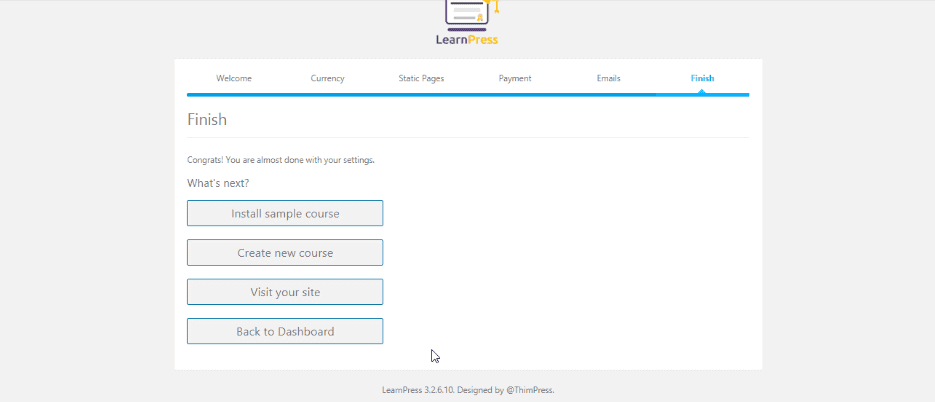
At this point, you have successfully configured LearnPress. Now choose your next action. Would you like to install a sample course, create a new course, visit your website, or return to your dashboard?
Note: For more settings, go to LearnPress >> Settings.
Step 4: Create your first online course
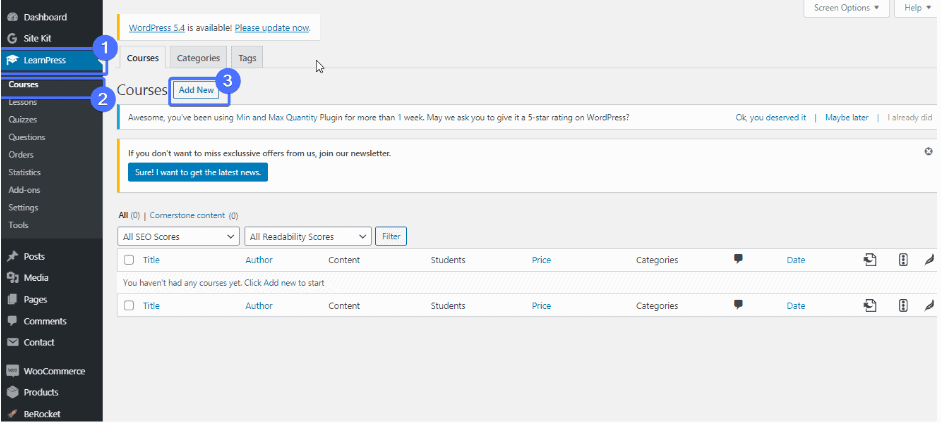
We created our course content in Step 2. Now it's time to add it to your website. To do this, go to LearnPress >> Courses. When the page opens, click the " Add new ».
The WordPress editor and the LearnPress course editor are identical. So this gives LearnPress an edge over other platforms with complicated interfaces.
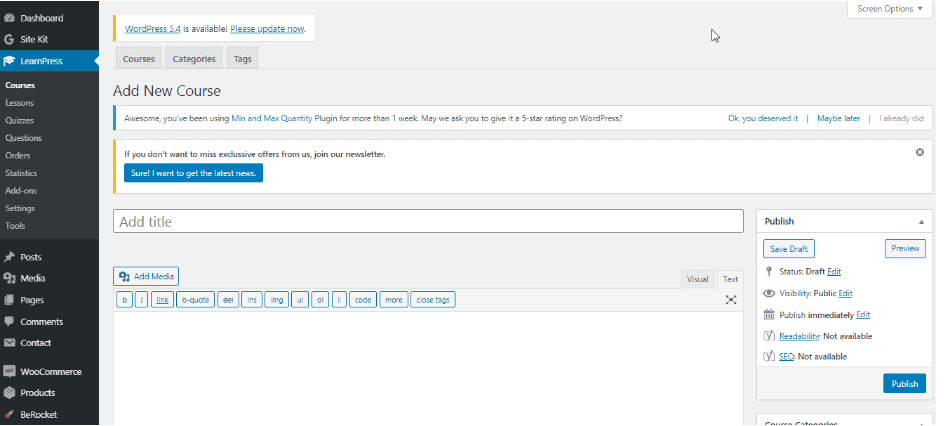
Next, add your course title and description.
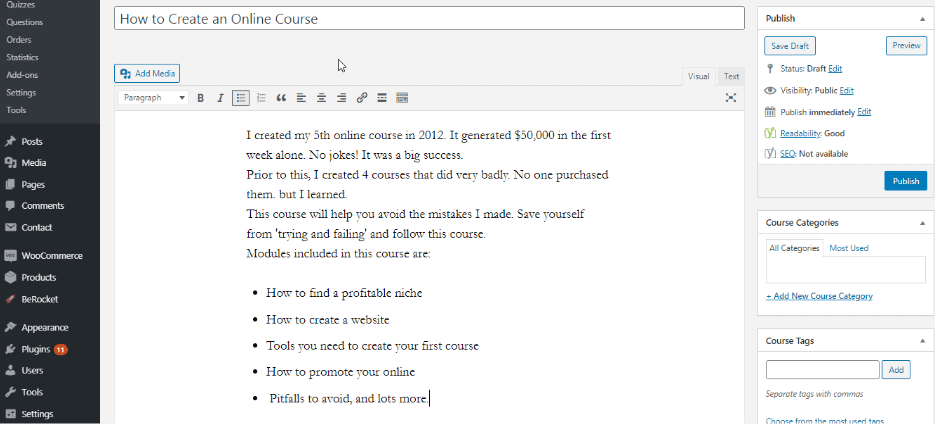
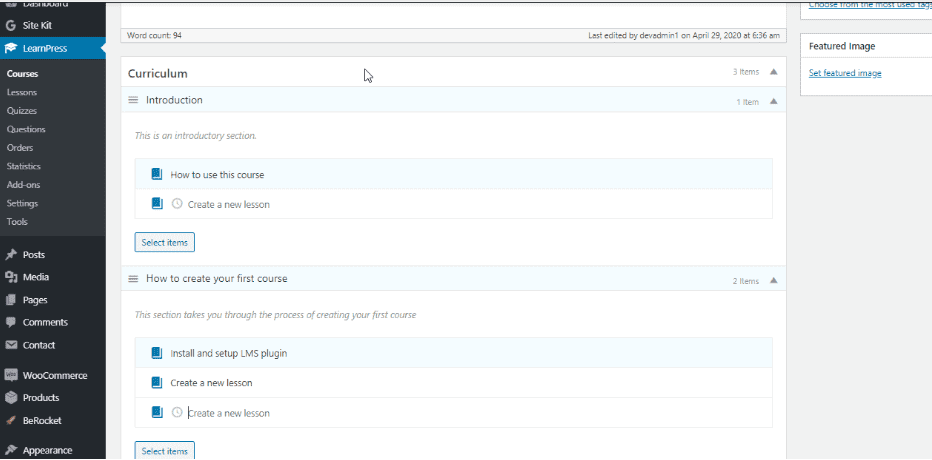
Additionally, you can divide your new course into sections and also divide the section into lessons.
To do this, scroll down to the " Curriculum Vitae ". Enter a section title and a brief description. Next, add lessons under your sections.
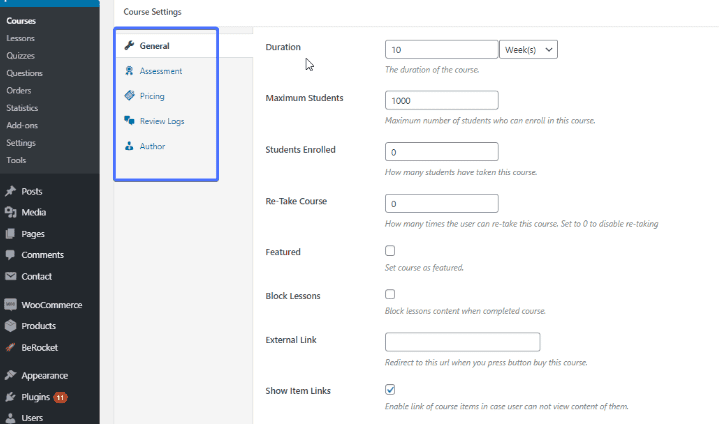
Scroll down to set course duration, price, maximum number of students to take the course, assessment method, and more.
Add lessons to your online course
In the previous step, we only created course titles. So it's time to modify each lesson. To do this, locate the lesson you wish to edit and click " Edit ».
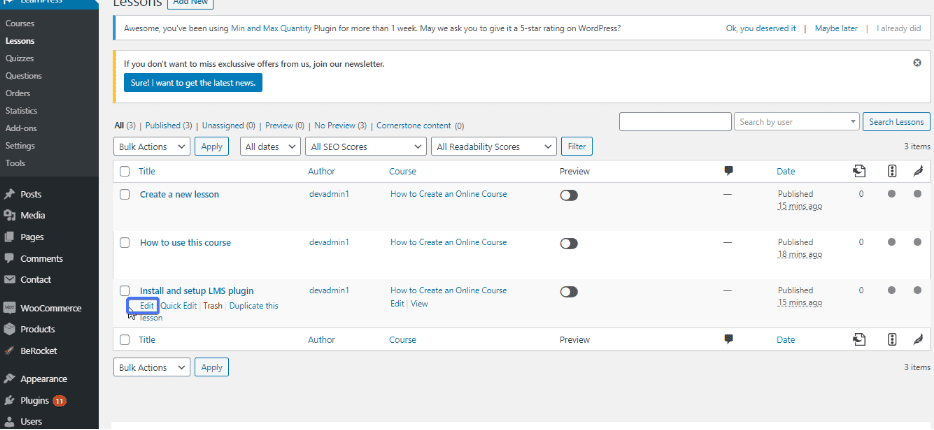
Add content in the editor. Also if you need to add photos or videos, click the " Add a media and download them.
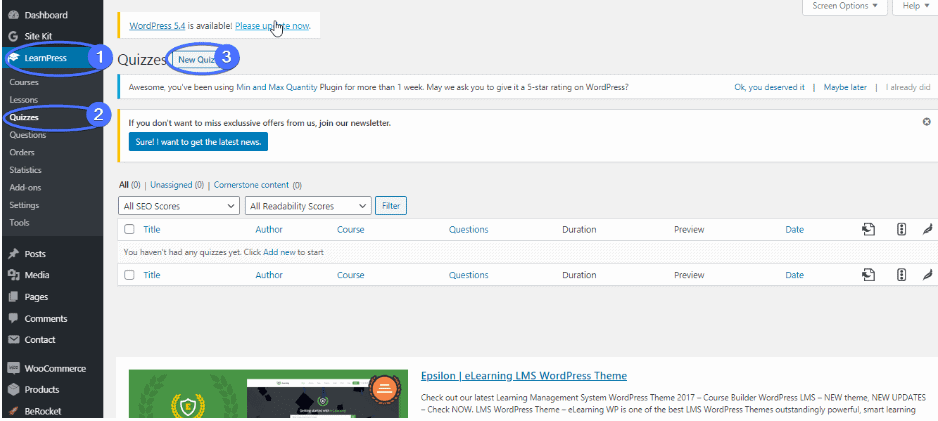
Add quizzes and assignments to your course
Quizzes and assignments are also necessary to assess a student's performance. So to add a quiz go to LearnPress >> Quiz >> Add New.
Next, enter your questions and choose the type of quiz (true/false, multiple choice or single choice).
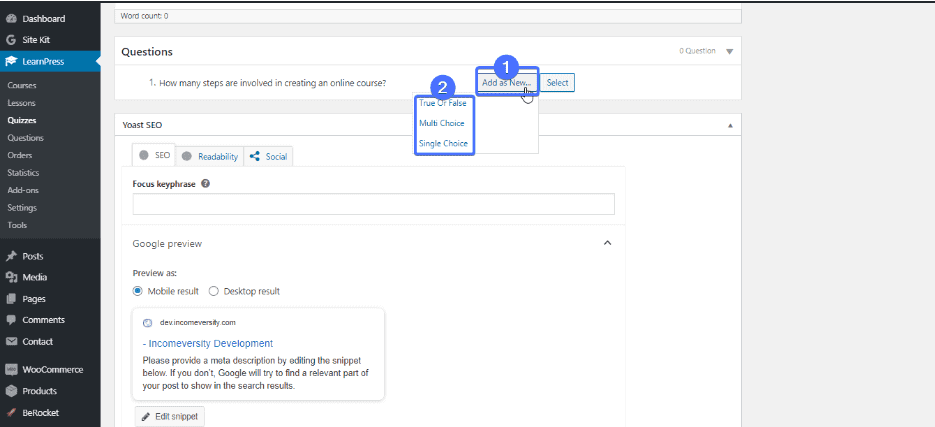
When you select a quiz type, you will be prompted to enter the correct answer, quiz tip, answer explanation, and number of points.
To also add a certificate to your course, purchase the "Certificate Add-on". LearnPress also provides a few free and premium add-ons to extend its functionality.
Step 5: Create a sales funnel
Building your course is one thing, making sales is another. Therefore, for incredible conversion rates, you need a great landing page. Landing pages, also called lead capture pages, are designed to convert visitors into subscribers.
You may also need to include a lead magnet to entice users to subscribe. To clarify, a lead magnet can be anything (a free e-book, blog post, video, etc.). With WordPress, however, you should have no problem promoting your online course and earning money.
Conclusion
In summary, creating and selling an online course on your website is a hell of a job, without a doubt. It takes a lot of your time and effort. However, your rewards – imparting knowledge, retaining students, paying clients, and building a business – are worth it! But before you leave, here is training that allows you to master your personal finances.


Leave comments